GO! Burp Cloth (#55863) AccuQuilt
$ 148,99 $ 59,60
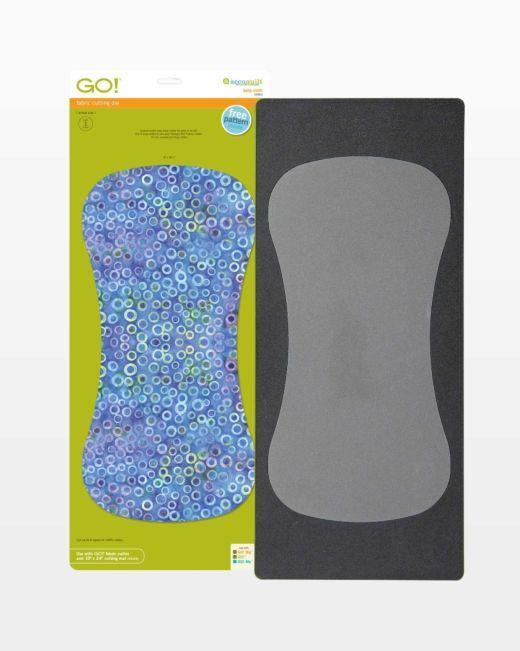
If you need a baby gift or just want an easy sewing project, these burp cloth shapes can be cut in minutes and sewn quickly and easily! Make it personal! The GO! Burp Cloth is designed to work with appliqué shapes that are 7″ x 5″ or smaller, such as the GO! Carefree Uppercase and Lowercase (55092, 55491) Alphabet sets, or embellish your burp cloths with embroidery.
AQ Cutting Mat Required:Â GO! Cutting Mat, 10 in. x 24 in. 2 Pack (25.4 cm x 61 cm) Item 255113
How to Die Cut Burp Cloths:Â
For best cutting results, position fabric on the lengthwise grain (straight of grain) as it goes under the roller.Â
TIP:Â The die is designed to cut three complete burp cloths in one pass through the cutter.Â
- For each color: Cut 1—19†x width of fabric (WOF) strip. Fanfold to 9 1/2†on die. Sub cut into 3 burp cloth pieces of each fabric. (6 total pieces)
Why Quilters Love the GO! Burp Cloth Die:
- Due to popular demand, the GO! Burp Cloth die is now available in both GO! And Studio.Â
- GO! Burp Cloth is a DIY (“do-it-yourselfâ€) Project die. These are popular shapes of projects that you make for yourself, to give as gifts or to sell.Â
- To template required. The GO! Burp cloth die includes a perfectly symmetrical, standard-sized burp cloth shape that is typically difficult to cut by hand.Â
- Cut three complete burp cloths in one pass thru the cutter (two cuts needed per burp cloth).Â
- Make burp cloths out of a variety of fabrics cut with your GO! Burp Cloth die: flannel, terry cloth, waffle, fabric, Cuddle® fabrics, cotton and more!
- Packaging includes a free pattern to get your started.Â
- Fat Quarter Friendly.
AccuQuilt Benefits:Â
- Cut so much more fabric in less time.Â
- Get accurate cuts every time — No slipping rulers or mistakes
- Easiest to use — Simply place die on cutter, then fabric and cutting mat on top
- Save fabric with Two Tone Foam — Get more out of your fabric by placing it only over the shape you want to cut.Â
- Safe to use — No blades come anywhere near your fingers.
Die Tips:
- With some fabrics, after cutting, a thread or two will remain where die blades meet. Snip threads with scissors.
- Use cutting mats that matches size of each die.
- For best results, cut with die blades running under roller at an angle. Do not cut with blades parallel to roller.
- Blades on some dies are positioned at an angle. Align fabric to edge of shape, not edge of die board.
- Some dies feature specially designed corners to aid in alignment and pre-cutting.
- For fast applique, apply fusible web to fabrics, then cut shapes with dies.
- Use good quality fabric to reduce fabric stretch.
- It’s always a good idea to test cut one shape before cutting many shapes to ensure fabric orientation is correct.
Fast Shipping and Professional Packing
Thanks to our longstanding association with UPS FedEx DHL and other leading international carriers, we are able to provide various shipping options. Our warehouse employees will pack every item to our exacting specifications. Your goods will go through an exhaustive inspection and securely secured prior to being delivered. We ship to thousands clients each day across multiple countries. This shows our commitment to be the largest online retailer in the world. Warehouses and distribution centers are located in Europe and the USA.
Orders with more than 1 item are assigned processing times for each item.
Before shipment, all ordered items will be thoroughly examined. Most orders today are shipped in 48 hours. The delivery estimate is between 3-7 days.
Returns
The inventory is constantly changing and we cannot control it completely because several parties are involved, including our factory and warehouse. The stock can change at any time. Be aware that your order will run out of stocks when you have placed the order.
Our policy is valid for 30 days. We will not return or exchange your purchase after 30 days from the date of purchase.
In order to be eligible for a refund your product must be unopened and in the same condition as when you received it. The item must be returned in its original packaging.
Related products
AccuQuilt Books and CDs
English Paper Piecing Made Easy Pattern Book by Katja Marek (#55188) AccuQuilt
AccuQuilt Cutting Die
AccuQuilt Cutting Die
AccuQuilt Cutting Die
GO! Carefree Alphabet Uppercase Set (2 – Die Set) (#55092) AccuQuilt
AccuQuilt Cutting Die
GO! Carefree Alphabet Lowercase Set (2 – Die Set) (#55491) AccuQuilt
AccuQuilt Cutting Die
AccuQuilt Cutting Die
AccuQuilt Cutting Die
AccuQuilt Cutting Die
AccuQuilt Cutting Die
AccuQuilt Cutting Die
GO! Boxed Bag by Carolina Moore (2 – Die Set) (#55529) AccuQuilt
AccuQuilt Cutting Die
AccuQuilt Cutting Die
AccuQuilt Cutting Die
AccuQuilt Cutting Die
AccuQuilt Cutting Die
AccuQuilt Cutting Die
GO! Apple Core – 6 3/4″ (6 1/4″ Finished) (#55036) AccuQuilt
AccuQuilt Cutting Die
AccuQuilt Cutting Die
GO! Blazing Star – 6” Finished by Eleanor Burns (#55051) AccuQuilt
AccuQuilt Cutting Die
AccuQuilt Cutting Die
AccuQuilt Cutting Die
AccuQuilt Cutting Die
AccuQuilt Fabric Cutters
GO! Big® Electric Fabric Cutter Starter Set (#55500) AccuQuilt
AccuQuilt Cutting Die
AccuQuilt Cutting Die
AccuQuilt Cutting Die
AccuQuilt Cutting Die
AccuQuilt Cutting Die
AccuQuilt Cutting Die
AccuQuilt Cutting Die
AccuQuilt Cutting Die


