GO! Owl Accessories (#55675) AccuQuilt
$ 53,99 $ 27,00
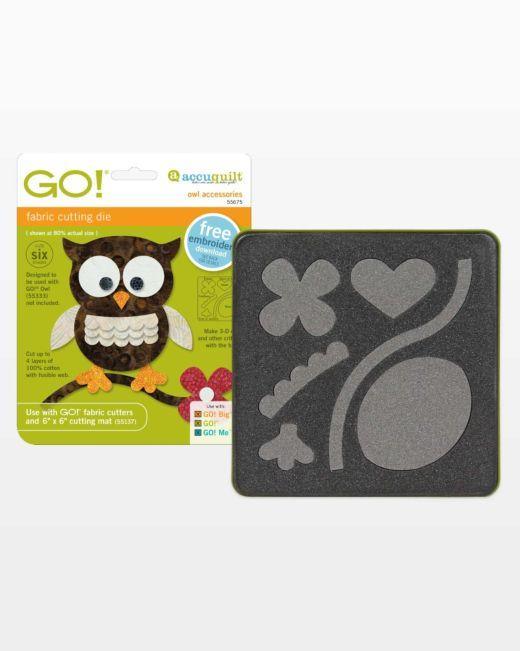
Have you fallen for our GO! Owl die and want to take your feathery friend to the next level? You asked, we answered! The GO! Owl Accessories die can now be purchased separately and expands the possibilities of many dies. Shapes include scalloped feathers, feet or antlers, a flower, a heart, a stem/branch or the base for making 3D critter projects
AQ Cutting Mat Required:Â No
How to Die Cut Owl Accessories Shapes:
For best cutting results, position fabric on the lengthwise grain (straight of grain) as it goes under the roller.Â
- Flower:Â Cut and fuse 2 1/2″ squares. Cut 16 flowers across the width of fabric. One yard of 40″ wide fabric cuts 224 flowers.Â
- Heart:Â Cut and fuse 2 1/2″ x 2″ rectangles. Cut 20 hearts across the width of fabric. One yard of 40″ wide fabric cuts 280 hearts.Â
- Stem:Â Cut and fuse 2″ x 6 1/2″ rectangles. Cut 6 stems across the width of fabric. One yard of 40″ wide fabric cuts 108 stems.Â
- Owl Base:Â Cut and fuse 3″ x 3 1/2″ rectangles. Cut 11 owl bases across the width of fabric. One yard of 40″ wide fabric cuts 132 owl bases.Â
- Feathers and Foot/Antler:  Place scraps on blade and cut. Â
Why Quilters Love the GO! Owl Accessories Die:
- You asked, we delivered! The GO! Owl Accessories die is now available to purchase separately. Â
- Designed to expand the possibilities of what you can create with the GO! Owl die.Â
- Add friendly 2-D owls to your projects or make 3-D animal buddies with the base. Add fun details like a flower or heart to make it your own!
- Use your imagination to create clever flower arrangements and other applique blocks. The wings become leaves, the feet/antlers become petals, and the owl body becomes a vase!
- Die cuts six shapes: Feather, Flower, Foot/Antler, Heart, Stem and Base (to create 3-D critters).Â
- A great way to use up scraps.Â
- Packaging includes a free pattrn to get your started.Â
- Charm Pack friendly. Â
AccuQuilt Benefits:Â
- Cut so much more fabric in less time.Â
- Get accurate cuts every time — No slipping rulers or mistakes
- Easiest to use — Simply place die on cutter, then fabric and cutting mat on top
- Save fabric with Two Tone Foam — Get more out of your fabric by placing it only over the shape you want to cut.Â
- Safe to use — No blades come anywhere near your fingers
Die Tips:Â
- With some fabrics, after cutting, a thread or two will remain where die blades meet. Snip threads with scissors.Â
- Blades on some dies are positioned at an angle. Align fabric to edge of shape, not edge of die board.Â
- Use good quality fabric to reduce fabric stretch.Â
- It’s always a good idea to test cut one shape before cutting many shapes to ensure fabric orientation is correct.Â
Fast Shipping and Professional Packing
Thanks to our longstanding association with UPS FedEx DHL and other leading international carriers, we are able to provide various shipping options. Our warehouse employees will pack every item to our exacting specifications. Your goods will go through an exhaustive inspection and securely secured prior to being delivered. We ship to thousands clients each day across multiple countries. This shows our commitment to be the largest online retailer in the world. Warehouses and distribution centers are located in Europe and the USA.
Orders with more than 1 item are assigned processing times for each item.
Before shipment, all ordered items will be thoroughly examined. Most orders today are shipped in 48 hours. The delivery estimate is between 3-7 days.
Returns
The inventory is constantly changing and we cannot control it completely because several parties are involved, including our factory and warehouse. The stock can change at any time. Be aware that your order will run out of stocks when you have placed the order.
Our policy is valid for 30 days. We will not return or exchange your purchase after 30 days from the date of purchase.
In order to be eligible for a refund your product must be unopened and in the same condition as when you received it. The item must be returned in its original packaging.
Related products
AccuQuilt Cutting Die
AccuQuilt Cutting Die
AccuQuilt Cutting Die
AccuQuilt Cutting Die
AccuQuilt Cutting Die
GO! Boxed Bag by Carolina Moore (2 – Die Set) (#55529) AccuQuilt
AccuQuilt Fabric Cutters
GO! Big® Electric Fabric Cutter Starter Set (#55500) AccuQuilt
AccuQuilt Cutting Die
GO! Carefree Alphabet Uppercase Set (2 – Die Set) (#55092) AccuQuilt
AccuQuilt Cutting Die
AccuQuilt Cutting Die
AccuQuilt Cutting Die
AccuQuilt Cutting Die
GO! Big Square – 10 – 1/2” (10” Finished) (#55592) AccuQuilt
AccuQuilt Cutting Die
AccuQuilt Cutting Die
AccuQuilt Cutting Die
AccuQuilt Cutting Die
AccuQuilt Cutting Die
AccuQuilt Cutting Die
GO! Big Double Wedding Ring – 12 1/2” Finished (#55258) AccuQuilt
AccuQuilt Accessories
AccuQuilt Cutting Die
AccuQuilt Cutting Die
GO! Blazing Star – 6” Finished by Eleanor Burns (#55051) AccuQuilt
AccuQuilt Cutting Die
AccuQuilt Cutting Die
GO! Circle – 1 1/2″, 1 3/4″, 2 1/4″, 2 1/2″ (#55155) AccuQuilt
AccuQuilt Cutting Die
AccuQuilt Cutting Die
AccuQuilt Cutting Die
AccuQuilt Cutting Die
AccuQuilt Cutting Die
GO! Carefree Alphabet Lowercase Set (2 – Die Set) (#55491) AccuQuilt
AccuQuilt Cutting Die
AccuQuilt Cutting Die
AccuQuilt Cutting Die
GO! Apple Core – 6 3/4″ (6 1/4″ Finished) (#55036) AccuQuilt
AccuQuilt Cutting Die
AccuQuilt Books and CDs
English Paper Piecing Made Easy Pattern Book by Katja Marek (#55188) AccuQuilt


