GO! Signature Circles – 6″ Finished (#55624) AccuQuilt
$ 107,99 $ 43,20
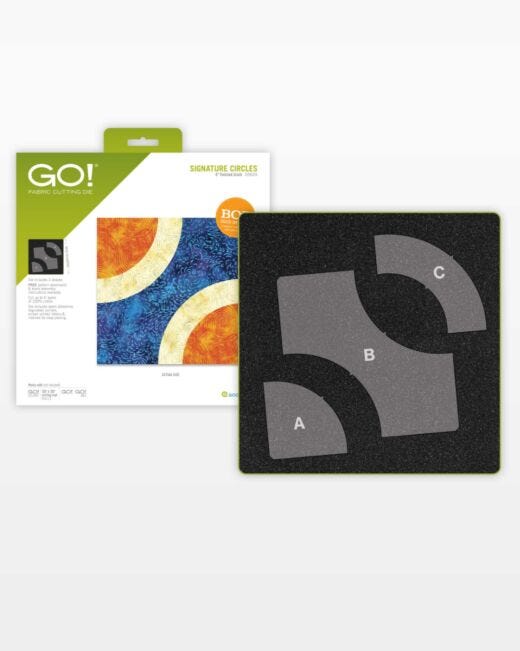
Curves are everywhere these days, and this die makes it easier than you would ever think to create bold modern looks and gently curved designs! This innovative die cuts the placement notches for you, leaving you free to imagine dozens of different projects.
Block Assembly Instructions
AQ Cutting Mat Required: GO! Cutting Mat, 10 in. x 10 in. (25.4 cm x 25.4 cm)
How to Die Cut 3-Color Signature Circles Block:
For best cutting results, position fabric on the lengthwise grain (straight of grain) as it goes under the roller. Tip: The die is specially designed to cut one complete 3-color, 6″ finished block in one pass through the cutter.
- Fabric Color 1 (A): Cut two 3 1/2″ squares. Place right side up over shape A to cut 2 shapes.
- Fabric Color 2 (B): Cut one 7″ square. Place right side up over shape B to cut 1 shape.
- Fabric Color 3 (C): Cut two 4 1/2″ squares. Place right side up over shape C to cut 2 shapes.
Why Quilters Love the GO! Signature Circles Die:
- Signature Circles is a Block on Board® (BOB®) die which means it’s specially designed to cut one 3-color, 6″ finished block in one pass through the cutter. Combine four 6″ blocks to make a 12″ finished block.
- No templates! No special rulers! Signature Circles includes 3 shapes that are difficult to cut by hand.
- Signature Circles features matching notches on curved seams and ¼” seam allowances for easy alignment and piecing.
- Signature Circles includes screen printed letters on die for easier piecing.
- Free pattern downloads and step-by-step block assembly instructions are available to get you started.
- Layer Cake-friendly
- Do you EQ? If you have Electric Quilt ® software, you can use it to create your own Signature Circles designs from their block library and cut your fabric
AccuQuilt Benefits:
- Cut so much more fabric in less time.
- Get accurate cuts every time — No slipping rulers or mistakes
- Easiest to use — Simply place die on cutter, then fabric and cutting mat on top
- Save fabric with Two Tone Foam — Get more out of your fabric by placing it only over the shape you want to cut.
- Safe to use — No blades come anywhere near your fingers
Die Tips:
- With some fabrics, after cutting, a thread or two will remain where die blades meet. Snip threads with scissors.
- Blades on some dies are positioned at an angle. Align fabric to edge of shape, not edge of die board.
- Use good quality fabric to reduce fabric stretch.
- It’s always a good idea to test cut one shape before cutting many shapes to ensure fabric orientation is correct.
Fast Shipping and Professional Packing
Thanks to our longstanding association with UPS FedEx DHL and other leading international carriers, we are able to provide various shipping options. Our warehouse employees will pack every item to our exacting specifications. Your goods will go through an exhaustive inspection and securely secured prior to being delivered. We ship to thousands clients each day across multiple countries. This shows our commitment to be the largest online retailer in the world. Warehouses and distribution centers are located in Europe and the USA.
Orders with more than 1 item are assigned processing times for each item.
Before shipment, all ordered items will be thoroughly examined. Most orders today are shipped in 48 hours. The delivery estimate is between 3-7 days.
Returns
The inventory is constantly changing and we cannot control it completely because several parties are involved, including our factory and warehouse. The stock can change at any time. Be aware that your order will run out of stocks when you have placed the order.
Our policy is valid for 30 days. We will not return or exchange your purchase after 30 days from the date of purchase.
In order to be eligible for a refund your product must be unopened and in the same condition as when you received it. The item must be returned in its original packaging.
Related products
AccuQuilt Cutting Die
GO! Blazing Star – 6” Finished by Eleanor Burns (#55051) AccuQuilt
AccuQuilt Cutting Die
AccuQuilt Cutting Die
AccuQuilt Cutting Die
AccuQuilt Cutting Die
AccuQuilt Cutting Die
AccuQuilt Cutting Die
AccuQuilt Cutting Die
AccuQuilt Accessories
GO! Big Electric Fabric Cutter Power Cord Replacement (#100471-001) AccuQuilt
AccuQuilt Cutting Die
AccuQuilt Cutting Die
GO! Carefree Alphabet Uppercase Set (2 – Die Set) (#55092) AccuQuilt
AccuQuilt Accessories
AccuQuilt Cutting Die
AccuQuilt Cutting Die
AccuQuilt Cutting Die
AccuQuilt Cutting Die
AccuQuilt Cutting Die
AccuQuilt Cutting Die
AccuQuilt Cutting Die
AccuQuilt Cutting Die
AccuQuilt Cutting Die
AccuQuilt Cutting Die
AccuQuilt Cutting Die
GO! Big Double Wedding Ring – 12 1/2” Finished (#55258) AccuQuilt
AccuQuilt Cutting Die
AccuQuilt Cutting Die
AccuQuilt Accessories
AccuQuilt Cutting Die
AccuQuilt Cutting Die
GO! Apple Core – 6 3/4″ (6 1/4″ Finished) (#55036) AccuQuilt
AccuQuilt Cutting Die
GO! Bowties – 4″ Finished by Alex Anderson Die (#55413) – Discontinued AccuQuilt
AccuQuilt Cutting Die
AccuQuilt Cutting Die
AccuQuilt Fabric Cutters
GO! Big® Electric Fabric Cutter Starter Set (#55500) AccuQuilt


