GO! DIY Face Mask – Large/Men Die (#55185) – Discontinued AccuQuilt
$ 94,99 $ 47,49
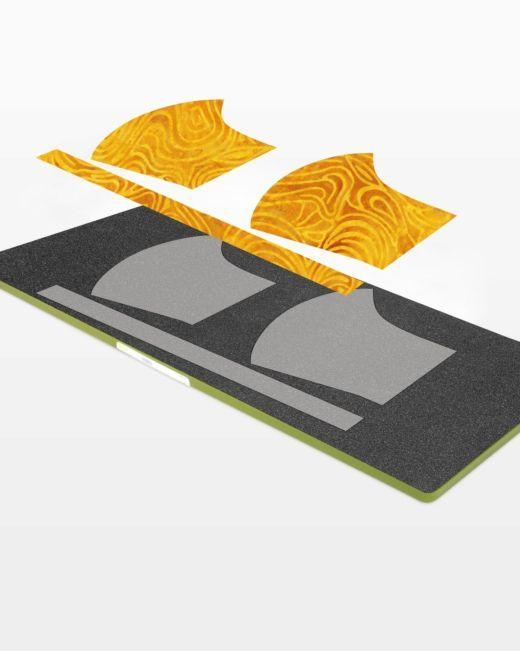
The GO! DIY Face Mask features three shapes for the outside of the mask, the lining and strip for fabric ties. The curved design helps the mask fit securely and comfortably over the nose and mouth, and comes in three sizes, small/child, medium/women and large/men. Note that each size is a separate die and must be purchased separately. The mask is simple to sew following our free directions.
*Please note that the CDC does not consider homemade masks personal protective equipment (PPE) and will only be used by professionals as mask covers or when no other alternative is available.
Visit our Quilting Under Quarantine page for helpful tips, great resources, inspiration and happy thoughts while we are homebound together.
FREE Download: Face Mask Assembly Instructions
AQ Cutting Mat Required: GO! Cutting Mat, 10 in. x 24 in. 2 Pack (25.4 cm x 61 cm) Item 55205
How to Die Cut DIY Face Mask Shapes:
For best cutting results, position fabric on the lengthwise grain (straight of grain) as it goes under the roller.
- Outer Face Unit: Cut 6-7/8″ x 7-3/8″ rectangles. Place on selected blade and cut. Cut five outer face units across the width of fabric. One yard of 40″ wide fabric cuts 25 outer face units.
- Inner Face Unit: Cut 6-3/8″ x 7-3/8″ rectangles. Place on selected blade and cut. Cut five inner face units across the width of fabric. One yard of 40″ wide fabric cuts 25 inner face units.
- Strip: Cut 14″ x 1-1/2″ rectangles. Place on selected blade and cut. Cut 26 strips across the width of fabric. One yard of 40″ wide fabric cuts 52 strips.
AccuQuilt Benefits:
- Cut so much more fabric in less time.
- Get accurate cuts every time — No slipping rulers or mistakes
- Easiest to use — Simply place die on cutter, then fabric and cutting mat on top
- Save fabric with Two Tone Foam — Get more out of your fabric by placing it only over the shape you want to cut.
- Safe to use — No blades come anywhere near your fingers
Die Tips:
- With some fabrics, after cutting, a thread or two will remain where die blades meet. Snip threads with scissors.
- Blades on some dies are positioned at an angle. Align fabric to edge of shape, not edge of die board.
- Use good quality fabric to reduce fabric stretch.
- It’s always a good idea to test cut one shape before cutting many shapes to ensure fabric orientation is correct.
Fast Shipping and Professional Packing
Thanks to our longstanding association with UPS FedEx DHL and other leading international carriers, we are able to provide various shipping options. Our warehouse employees will pack every item to our exacting specifications. Your goods will go through an exhaustive inspection and securely secured prior to being delivered. We ship to thousands clients each day across multiple countries. This shows our commitment to be the largest online retailer in the world. Warehouses and distribution centers are located in Europe and the USA.
Orders with more than 1 item are assigned processing times for each item.
Before shipment, all ordered items will be thoroughly examined. Most orders today are shipped in 48 hours. The delivery estimate is between 3-7 days.
Returns
The inventory is constantly changing and we cannot control it completely because several parties are involved, including our factory and warehouse. The stock can change at any time. Be aware that your order will run out of stocks when you have placed the order.
Our policy is valid for 30 days. We will not return or exchange your purchase after 30 days from the date of purchase.
In order to be eligible for a refund your product must be unopened and in the same condition as when you received it. The item must be returned in its original packaging.
Related products
AccuQuilt Books and CDs
English Paper Piecing Made Easy Pattern Book by Katja Marek (#55188) AccuQuilt
AccuQuilt Cutting Die
AccuQuilt Accessories
GO! Big Electric Fabric Cutter Power Cord Replacement (#100471-001) AccuQuilt
AccuQuilt Cutting Die
GO! Carefree Alphabet Lowercase Set (2 – Die Set) (#55491) AccuQuilt
AccuQuilt Cutting Die
AccuQuilt Cutting Die
AccuQuilt Cutting Die
GO! Bowties – 4″ Finished by Alex Anderson Die (#55413) – Discontinued AccuQuilt
AccuQuilt Cutting Die
AccuQuilt Cutting Die
AccuQuilt Accessories
AccuQuilt Cutting Die
AccuQuilt Cutting Die
AccuQuilt Cutting Die
GO! Carefree Alphabet Uppercase Set (2 – Die Set) (#55092) AccuQuilt
AccuQuilt Cutting Die
AccuQuilt Cutting Die
GO! Big Square – 10 – 1/2” (10” Finished) (#55592) AccuQuilt
AccuQuilt Cutting Die
AccuQuilt Cutting Die
AccuQuilt Cutting Die
AccuQuilt Cutting Die
GO! Boxed Bag by Carolina Moore (2 – Die Set) (#55529) AccuQuilt
AccuQuilt Cutting Die
GO! Blazing Star – 6” Finished by Eleanor Burns (#55051) AccuQuilt
AccuQuilt Cutting Die
AccuQuilt Cutting Die
AccuQuilt Cutting Die
AccuQuilt Cutting Die
AccuQuilt Cutting Die
AccuQuilt Cutting Die
AccuQuilt Cutting Die
AccuQuilt Cutting Die
AccuQuilt Cutting Die
GO! Circle – 1 1/2″, 1 3/4″, 2 1/4″, 2 1/2″ (#55155) AccuQuilt
AccuQuilt Cutting Die
AccuQuilt Cutting Die
AccuQuilt Cutting Die
GO! Big Double Wedding Ring – 12 1/2” Finished (#55258) AccuQuilt


